|
|

Rank: Advanced Member
Groups: Member
Joined: 9/7/2005
Posts: 1,155
Location: Copake, NY
|
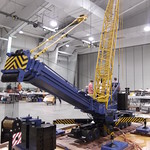
Here are some pictures of the progress I made. I have worked on it for almost two years now. All the axles, including 4 driven ones are ready now and so is the suspension. Most of the carrier frame is there. The next thing to do is to connect all the steering axles, then to connect all the driven axles. This will be a challenge because space is very tight! I hope you enjoy!    Kerst
 http://forums.dhsdiecast.com/default.aspx?g=posts&m=1096251 http://forums.dhsdiecast.com/default.aspx?g=posts&m=1096251
|
|

Rank: Advanced Member
Groups: Member
Joined: 9/8/2007
Posts: 2,764
Location: Norfolk,va
|
nice, cant wait to see it finished
|
|
Rank: Advanced Member
Groups: Member
Joined: 10/4/2002
Posts: 1,532
|
nothing like see'n a project comin out of the closet for the world to revell ,,,
man fine job so far ,, take you time ,,its gonna be a sweet lookin rig ..
|
|

Rank: Advanced Member
Groups: Member
Joined: 1/22/2008
Posts: 2,027
Location: Maryland
|
Stunning project, I love seeing the progress of the great over-the-top customs like yours.
Thanks for the post,
Mark
Mark L.
It's what you learn after you know it all that counts
|
|
Rank: Advanced Member
Groups: Member
Joined: 9/7/2005
Posts: 1,155
Location: Copake, NY
|
I had a bit of trouble with the steering linkage (No space!), so the past week was dedicated to solving these problems. I had to adjust the suspension system a bit to make space for the steering linkage. here are some pictures of the results.   By kerstdejongKerst
http://forums.dhsdiecast.com/default.aspx?g=posts&m=1096251
|
|
Rank: Advanced Member
Groups: Member
Joined: 3/24/2004
Posts: 2,291
|
Oh man that's looking sweet!!
this is one project I can't wait to see finished!!!
|
|

Rank: Advanced Member
Groups: Member
Joined: 1/23/2007
Posts: 3,636
Location: Staten Island NY
|
Awesome work!!
|
|
Rank: Advanced Member
Groups: Member
Joined: 1/22/2008
Posts: 2,027
Location: Maryland
|
That is awesome work, people like yourself that take on these huge projects really impress me! Keep the updates coming.
Mark
Mark L.
It's what you learn after you know it all that counts
|
|
Rank: Advanced Member
Groups: Member
Joined: 9/7/2005
Posts: 1,155
Location: Copake, NY
|
Here is a little update. I made the frame work of the cab. The back is still completely open and I will keep it that way till I have found a place for all the components,like steering servo, etc. With the cab the whole thing starts to look like something. See you at IMCATS!   Kerst
http://forums.dhsdiecast.com/default.aspx?g=posts&m=1096251
|
|

Rank: Advanced Member
Groups: Member
Joined: 7/31/2005
Posts: 5,487
Location: Breisach, Black Forest, Germany
|
perfect! when will you start painting it? just kidding. i like it. also nice to see you build the old cab version. any ideas what colours you´ll give the machine? do you model it after a very certain LTM1800? (as those f#ckers of course all have small differences  ) 
|
|

Rank: Advanced Member
Groups: Member
Joined: 8/24/2006
Posts: 2,185
Location: Grapevine, Tx
|
Looking great Kerst! Thanks for the update.
Jeff
|
|

Rank: Advanced Member
Groups: Member
Joined: 6/30/2003
Posts: 4,920
Location: Melbourne, Australia
|
I was wondering how this was going, thanks for the update Kerst. It looks great! Will it be traveling with you to IMCATS? Rowan.
1:25th scale CAT 375L excavator
|
|
Rank: Advanced Member
Groups: Member
Joined: 9/7/2005
Posts: 1,155
Location: Copake, NY
|
RowanH wrote:I was wondering how this was going, thanks for the update Kerst. It looks great! Will it be traveling with you to IMCATS?
Rowan. Yes, it will, but not under its own power! Kerst
http://forums.dhsdiecast.com/default.aspx?g=posts&m=1096251
|
|
Rank: Advanced Member
Groups: Member
Joined: 9/7/2005
Posts: 1,155
Location: Copake, NY
|
A little update. I worked on the rear end of the carrier and built the sewing motor and gears. The whole assembly, whichcan be seen on the first picture on top of the frame belongs inside the frame as on the second picture. I started building the outriggers and have been working on the design the transfer box.   Kerst
http://forums.dhsdiecast.com/default.aspx?g=posts&m=1096251
|
|

Rank: Advanced Member
Groups: Member
Joined: 2/8/2008
Posts: 4,174
Location: Anchorage, AK
|
Always nice to see the work of a real craftsman. Superb... 
|
|
Rank: Advanced Member
Groups: Member
Joined: 9/7/2005
Posts: 1,155
Location: Copake, NY
|
A short update: During the past month I worked on the outriggers. This proved to be quite a challenge. They have to be strong and because they are a real feature of the crane and are very prominent, there was just one way: make exact copies of the real ones. I decided to use steel for strength and brazed most of the important joints. There are still a few details to be done, but the basic outriggers are there.    Kerst
http://forums.dhsdiecast.com/default.aspx?g=posts&m=1096251
|
|

Rank: Advanced Member
Groups: Member
Joined: 3/24/2007
Posts: 1,492
Location: Newfoundland, Canada
|
Again, like I said in a previous post...Craftsmanship at its finest!! this time it even has the details right down to the goodyear logo on the tires!!
GH
|
|
Rank: Advanced Member
Groups: Member
Joined: 9/7/2005
Posts: 1,155
Location: Copake, NY
|
hulan wrote:Again, like I said in a previous post...Craftsmanship at its finest!! this time it even has the details right down to the goodyear logo on the tires!!
GH The tires are from the All American Toy Co. ( http://www.allamericantoyco.com ) kerst
http://forums.dhsdiecast.com/default.aspx?g=posts&m=1096251
|
|

Rank: Advanced Member
Groups: Member
Joined: 11/17/2008
Posts: 1,340
Location: Varies
|
rc?
-Sean
|
|
Rank: Advanced Member
Groups: Member
Joined: 9/7/2005
Posts: 1,155
Location: Copake, NY
|
|
|
|
Guest |